Monday, December 29, 2008

macaroons project

Here it is. The long awaited post of what I’ve been calling my “macaroon project”. Please be warned, this post will be a lengthy one. My fondness of these adorable little sweets has its ups and downs. I remembered disliking it when I first tried a pistachio macaroons when I was just a little girl. It may be the fact that I used to hate pistachio as a little girl, or I just don’t like the chewy texture. But my take on that particular nut has changed 180 degrees. I grew an addiction to anything pistachio, whether it’s savoury or sweets. I have come to love macaroons ever since I move to Australia 6 years ago. It is not until early this year when I challenged myself on to making my own macaroons for a friend’s birthday party. A challenge which ended with a teary disaster. After 3 failed batches, I finally gave up.

When I found out that Savour offered a half day macaroon class, I decided to enrol and found out the secrets behind these sweet little thing. We made 8 different macaroons that day. I was quite disappointed that my favourite of all, pistachio macaroons, was not one of them. I distribute the macaroons to friends and people at work, everyone absolutely LOVED it. Her fuzziness at work even requested this for Christmas. She read my mind!!

I promised to myself that I would get a lot of practice before making it for Christmas hampers. And this year, I will planned ahead since Paul at Savour said that macaroons can easily be stored frozen up to 6 months. A plan so beautiful if I was just disciplined enough to actually follow it. Ever since I went back to uni part time, my timing is way off. Not much baking as I liked it to be. I’m exhausted all the time. My weekends are spent in libraries and computer labs rather than in front of the oven. Next thing I know, it was already the first week of December, and I haven’t even try making macaroons at home.

At Savour, they taught us 3 different techniques, Italian (using Italian meringue), French (the usual meringue technique), and Spanish (I forgot which one is this one, and as I end up not using this technique, I can’t even remember what distinct this one from the other techniques). I planned to make 9-10 different flavours for 20 friends. Yes.. yes.. I know.. It was quite ambitious (or even delusional) of me. But I always loved a good challenge, and the perfectionist in me just couldn’t resist it. I made the first batch using the Italian technique, and it worked really well, even though I had a couple of case of ‘Siamese twins ‘ due to the lack of spacing I made when piping the macaroons. The second batch was made using the French method. I don’t know whether it was my ‘macarooner’ technique that went wrong or it was because i was in a foul mood when i made it, i just know that it was a disaster. My macaroons turned out to be more cookie like, than a fluffy, chewy meringue. Lesson learned! Never bake when you’re upset. I thought it would cheer me up, it made it even worse. I decided to stick with the Italian techniques for all my macaroons.

I’d like to thank to Helen at Tartelette for her AMAZING macaroon recipes. She’s just such an amazing baker. Her recipes are innovative and her photos never failed to make me drool. I had to refrain myself from licking my screen every time I visit her blog. The fact that she is such a lovely person makes her blog my daily bread. After seeing her pecan pie macaroons, snickers macaroons, red berry macaroons (I used blueberry instead since I coloured the shells purple) and opera macaroons, I just can’t resist including these flavours in my macaroons project.

So, together with those 4 flavours, I made pistachio macaroons with pistachio buttercream filling, chocolate macaroons with 70% Valhorna dark chocolate ganache, crunchy hazelnut macaroons with crunchy hazelnut praline ganache, vanilla macaroons with vanilla-white choc ganache, Dulce de leche macaroons and Lemon macaroons with lemon curd filling.
After cartons over cartons of eggs, I finally finish my macaroons on Monday 22 December at 2 AM. Just in time for Christmas. I made a cute little gift tag and some illustrations on the different flavours of the macaroons to be included in the box. It will save me a lot of time explaining the flavours to everyone. EVERYONE loved it. A few of them even giving me orders for more. I don’t think I would want to look at macaroons anymore, at least for a little while.

Merry Christmas & Happy New Year Everyone! =)


Saturday, December 27, 2008

tis the season to be jolly

Ah... the joy of giving...

This will be my first post that doesn’t involves food. I know this is not a big deal, but after receiving so many thoughtful gifts, I just felt that I should say something. For someone that grew up surrounded with Muslim family, receiving gifts on Christmas is not part of my childhood memories. My mum and dad is a devoted Christian, but apart from them, all my rellies are basically Muslim. Oh, let’s not forget my Buddhist grandparents, and no, I don’t have a Chinese background. I just have a diverse religious and cultural background in my family.
When I receive so many thoughtful gifts from friends and co-workers especially when most of the givers doesn’t celebrate Christmas, I thought this post would be the perfect way to show my gratitude.

The most special of all would be from my beloved M. He bought me Jamie Oliver’s Flavour shaker. The one thing I never missed to pick up every time I’m at a homeware stores. Of course, always ended up putting it down since I still can’t think of its usage. Now, I can use it to grind spices with ease, and having lots of fun at the same time. And what makes it better, he bought me a blue one. Matches perfectly with my apartment decor.

Thank you so much guys! Me heart each and every one of you!

Hugs & Kisses,

Asti

Friday, December 26, 2008

Monday, December 22, 2008

Welcoming summer and a taste of home


Summer is finally here.. After 21 days of what it said to be ‘summer’, Melbourne finally delivers it’s first sunny day. In a city where drastic change in weather is likely to happen in a split second, any ‘nice day’ calls for a celebration. Conveniently, my friend chose this day to hold his farewell BBQ in the park. Lying under a tree with a stomach full of sausages and chicken skewers is just what the doctor order.

As always, I am expected to bring the dessert. A task I happily take with open arms. Unfortunately, this time, I may bit more than I can chew. I had to finish off my macaroon project before I can make something else, otherwise it won’t make the cut before christmas.

Acquiring almost one container full of egg yolks from making macaroons, I decided to look for recipes to help me use some of them up. At first I’m thinking of crème brulee, but I’ve made one just recently, and it was for the same friends. Then I remembered a cake from my childhood that is made basically out of egg yolks. I grew up eating this cake almost everyday. Its buttery softness with a hint of spice always made me think of home. We call the cake ‘lapis legit’, which usually translated to ‘thousand layer cake’ or spekoek if you’re familiar with the dutch language. The cake doesn’t really have a thousand layers, but believe me, when you tried making it, it felt like it has a thousand layers. Since all my friends that is coming to the BBQ are Indonesians, I’m sure they will like this cake. I’ve not yet known someone that doesn’t like lapis legit.

The batter is quite simple to make, and what’s make it better, it used up nearly all my yolks. It calls for 500gr of yolks just to make one 11 inch square cake!! I went easy with the spices, because I was afraid it will over power the cake. But it turned out quite mild to my liking. I love a bit of a kick in my food sometimes. I decided to go a little creative since I have extra time while waiting for my macaroons to bake. I separated about an eighth of the batter and put different flavouring to it. I will alternate the plain layers and the flavoured ones thus creating a new kind of lapis legit. I know this has been done before. There is actually quite a lot of variations to lapis legit such as chocolate or where people add dried fruits or cheese in between the layers. I wanted to make the cheese version specially for M, my beloved who loves to eat anything but when it comes to dessert, he will not appreciate unless it’s something cheesy. I ran out of cheese, and I can’t leave my macaroons home alone to go to the shop, so I put the cheese lapis legit to my I WILL COOK THIS SPECIALLY FOR YOU list.

It’s hard when one household doesn’t have the same taste in food, especially when the other one is as fussy as M. He loves asian food, especially Indonesian. I like them too, don’t get me wrong. But cooking them, is a whole different story. I hate slaving more than 3 hours in front of the stove, buying around 10 different spices that I will only use once just to cook something I can easily get from China town for less than 10$ and tasted more authentic (and greasier). I do make exemption sometimes, and I actually quite thankful for him. If it wasn’t for him, I would never even think of trying to cook anything Indonesian.

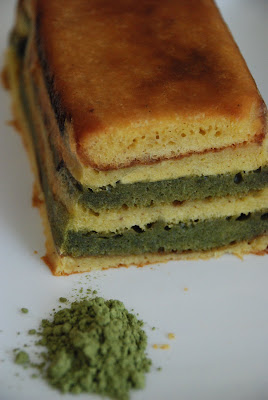
Ok, back to the cake. I decided to do a green tea and chocolate version since I still have some matcha powder left in my pantry. Baking the cake is not complicated, it just takes a bit of time and care. Once you get a hang of when to put the next layer in, it’s quite easy really. The green tea and chocolate turned out beautifully. The plain one can do a little bit of extra time in the oven, but it still tasted great. I only managed to take a proper photo of the green tea and chocolate since by the time the cake came out of the oven, we’re already about an hour late for the BBQ. I brought my camera and some cinnamon quills and star anise to the park hoping for a chance to set up a photo shoot, but when I looked away just for a split second, the cake was all gone! I guess I can always make another one with the egg yolks I will have from making the last batch of my macaroon project.


Lapis Legit / Thousand layer cake / Spekoek

Ingredients

500g unsalted butter, softened at room temperature
100g caster sugar
500g egg yolks
100g egg whites
1 tin condensed milk
1 tbsp golden syrup or honey
1 tsp vanilla essence
170g* plain flour, sift at least 3 times, making sure there is no lumps.

*when making green tea or chocolate lapis legit, reduce the flour to 140g, and add 30g of dutch processed cocoa powder for chocolate or 30g of matcha powder for green tea.

mixed spices
1/2tsp ground star anise
1/2tsp ground ginger
1/2tsp ground nutmeg
1/2tsp ground clove
1/2tsp ground cinnamon

Method:

1. Grease and line an 8″ square tin. Preheat oven to 180o C. Put tin inside the oven while the oven is preheating.

2. In a stand mixer, using the whisk attachment, beat egg yolks with sugar at high speed until thick and pale. When you lift the whisk, the batter should form a ribbon. In a separate bowl, using the paddle attachment, cream butter with condensed milk, vanilla, golden syrup & mixed spices. Do not over mix.

3. Combine the egg yolk mixture to the butter mixture and mix well using a wooden spoon or mixer at a low speed. Add the sieved flour last, fold it in gently.
If you are making the chocolate or green tea lapis legit,take 1/3 of the batter and add in cocoa powder for chocolate or matcha powder for green tea

4. In a separate bowl, beat egg whites with a pinch of cream of tartar (optional) until stiff peaks. Gently fold it into the butter-egg mixture.

5. Take the tin out from the oven, spread 2 tbsp of mixture and bake for 10-15 mins, or until the top of the layer is firm to touch and has a lovely brown colour throughout. It is best not to turn your back from the oven for the entire time. Watch it like a hawk, turn the cakes around if necessary to ensure even cooking.

6. Working quickly, spread 2 tbsp for the next layer and grill each layer for about 3 mins. Make sure that the layer is evenly browned before adding the next layer, otherwise you won’t get that brown lines that separates each layers.
For chocolate or green tea lapis legit, do the layers in the following order:

a. Plain – plain – choc/green tea – plain – plain – choc/green tea – plain – plain... etc, finishing with the plain batter.

7. When the top layer is completed, check to see how wet the sides are. If it’s still pretty wet, bake it for another 10 mins, covered with an aluminium foil. If it’s quite dry, bake it for another 5 mins, covered with an aluminium foil. Or until it’s firm to touch and sides are completely dry.

8. Cool cake completely on a wire rack before cutting.

9. Best served with a pot of jasmine tea.

Saturday, December 20, 2008

Ho ho ho


A friend at work gave me a jar of homemade preserved cherries for Christmas present. Since I don’t really like to cook with cherries, I decided to make a cake to bring to our company’s Christmas BBQ. Don’t get me wrong, I can’t get enough of cherries, especially the red/white kind or American Cherries which i missed so much. I just don’t like to use cherries in cakes or any sort of cooking. Cherries are better eaten fresh according to my taste.

At first I wanted to make a Christmas pudding, but since I’m still in the middle of making macaroons for this year’s Christmas hampers, the extra long hours and effort to make a Christmas pudding is just not what I need right now. A simple chocolate blackforrest cake seems like the best solution, and I don’t have to stop by the shop, since I have all the ingredients handy.

To make it a little bit Christmas-sey, I decided to make it in the shape of a Christmas wreath with chocolate leaves, hollies, and a big red bow. I want my cake base to be soft, spongy, something quite light that will go nicely with the greasy, smoky taste of BBQ food. Therefore, I decided to use the cake base of a chocolate roulade that has a soufflé like texture.

Since this is the first time I have ever made a sugar bow, I decided to use ready made icing from coles. I have made one from chocolate modelling paste before, but never from an icing. Nor have I ever work with rolled icing decorations before. This will be an experiment for me. Oh how so exciting!

I coloured the icing red using the red liquid colouring. It turned out really good at first, despite my nails are all red as if I just killed someone. When I shaped the bow, the icing turns out to be very fragile and quite brittle. So I made another bow from the plain icing and decided to paint it red when it’s dry. It’s a little bit messier, but I reckon it worked out quite well, it even gives a slight shine to the bow.

Tuesday, December 16, 2008

You had me at hello

Hello all!

Welcome to my blog..

First, let me talk a little bit about the person behind the blog. I'm Asti, a 20 something sweet tooth. I love anything sweet. Baking has been my passion since I was a little girl. Started out from Betty Crocker pre-mix cakes to the simple brownies and cookies I baked when I was just 11 years old, to the passionate baker that I am today. I can say that baking had saved my life once. It helped me through my toughest time. It created a sanctuary where I can create a world outside the normal world where I can escape to.

This blog I created as a culinary outlet where I can freely express my love of food and baking, the chance to show off my photography skills are also a bonus. I have a love on everything colourful. Perhaps that’s why I am a designer by trade. That also leads to my love of cake decorating.

I don’t have a background in cooking or pastry, so I don’t have the technical ability of making a recipe from scratch. The food I cook is usually adapted from recipes I found from cooking books or online. Opinions of foods are based on my own preference, it is hardly an expert opinion.

Consistency. I can truly admit that I have a problem in this. I’m known to start one thing and then got bored and neglect it. That’s what happens with me and music. I started playing a number of instruments, but failed to keep at least one skill. Hopefully *fingers crossed*, it won’t happen with this blog =)!

Hope you enjoy your visit!

Smooches =)

Asti