Tuesday, October 27, 2009

French Macaroons - Daring Baker October 2009


Where did time go? I haven't had the chance to blink yet, and it's time for another daring baker's challenge.

First of all, you must forgive the lack of creativity in the photos, nor the quality the photos I might say. I'm in the midst of moving back to Jakarta, and I barely have a chair to sit on, let alone a table to shoot the macaroons. I had to do it on a piece of chopping board on the floor. My apartment is completely empty now. The boxes was picked up today to be shipped to Jakarta. I still can't believe that a tiny person can accumulate so much stuff. My cargo actually weighs a shocking 400 kgs!! These past weeks has been filled with packing, packing and more packing. It's not an easy job to pack 7 years of your life!!

The reality is starting to sink in now.. 15 more days to go.. No turning back!!

Even in the midst of my move, my bestfriend made a request for some of my baked goods. She consider this as her way to ask for a piece of me to stay here with her. She is planning to freeze some so she can enjoy my homemade baked goods, even if I can't be here to make it for her. Not easy ones I might add. She asked for hot cross buns, croissant and macaroons. That's why I was quite overjoyed when I found out that this month's challenge is french macaroons.

Before I start yapping about the macaroons, here is the mandatory lines that need to be said each month: The 2009 October Daring Bakers’ challenge was brought to us by Ami S. She chose macarons from Claudia Fleming’s The Last Course: The Desserts of Gramercy Tavern as the challenge recipe.


I made macaroons before, but this recipe is new for me. I was not in the mood of making dozens and dozens of macaroons. My goal is only make enough macaroons for my friend, I don't think I'm up for macaroons these coming days, and M is not the type of person to crave for them unless I put it in front of his eyes. So leaving some in the freezer is definitely not an option, nor carrying them all the way to Jakarta (don't think they travel well). So in the flavours, I have to take my friends taste buds into consideration. She doesn't really like rich desserts, she is more into fresh stuff, something fruity perhaps. So in welcoming Spring which finally has sprung here in Melbourne, I decided to showcase some of spring and tropical fruits like kiwi, watermelon and lychee. I still put in chocolate as it is always a safe option. However, I don't feel like making 6 (oh, I forgot to mention lavender & rose) different buttercream/ganache, so I decided to use cream cheese buttercream and just put the different pate de fruit in the middle. I planned to made the turkish delight for the centre of the rose macaroons, but was just to overwhelmed with everything, so decided to cross the road to Thomas Dux Grocer and pick up a pariya turkish delight. I wanted to colour the shells, but I think I was in a hurry when I did the macarooning after colouring the batch, the white shells are the only ones that work. So I got creative and use the white shells and paint different colours on them to indicate the flavours. It's pretty too =)

lychee

kiwi

rose with turkish delight centre

This would be the last daring baker's challenge I bake in Melbourne.. sob sob.. In the good side, I'm moving to a bigger house with more crockery and tableware to play with. However, an insufficient oven (believe it or not, my mom only have a small microwave oven!!) and the daunting humidity looms.

As always, thank you ladies for yet another fun challenge. Till next month =)

**PS: I'm sorry if I don't have time to comment on your macaroons, I don't have a computer anymore, let alone an internet connection. I'll try my best, but no promises. The only time I can be online is at M's house, and I can't be too long, as he needs the computer too.**

Thursday, October 1, 2009

Time to get the rolling pins out! - DB does vol au vent

4 days late, but I come with 4 different variations of vol au vent. I must admit, I cringed when I read that this month's DB challenge involves puff pastry. I've made a couple of successful puff pastry in the past, but I'm still not comfortable in doing any lamented dough. I always find it quite temperamental. But, when you get it right, it is so worth the effort.

The September 2009 Daring Bakers' Challenge has been chosen by Steph of a whisk and a spoon. Steph chose Vols-au-Vent, which we are pretty sure in French means, “After one bite we could die and go to heaven!”


As always, I want to try to do as much varieties as I can. I have lots of leftover in my fridge, so I decided to use them as I can. I ended up making 2 savouries, and 2 sweets. In the spirit of Ramadhan, I made some opor ayam, and I still have some leftover, so I shredded the chicken and thicken the soup and made it as one of the savoury filling. For the other savoury one, I use up some leftover from the chicken sweet chilly mayo wrap, my yesterday's lunch.


For the sweets, I incorporate leftover salted caramels from my boss' order and the IMBC (Italian Meringue Buttercream) leftover from the cake order last weekend. I transform the IMBC into 2, one gets a burnt sugar syrup added to them to make burnt sugar frosting, and the other one was whipped together with a lavender syrup. I paired the burnt sugar frosting with layers of salted caramel and chocolate ganache. Whereas the lavender frosting got paired with Yuzu lemon curd. This is particularly my favourite. The tartness from the curd complements the sweetness of the frosting beautifully with a slight lavender undertone. Perfect to welcomes the spring (which is suppose to come by now, but it is still bloody cold here).


Check out the Daring Bakers roundup for other fantastic vol au vent. Thanks again ladies for the sweet challenge =)

Thursday, August 27, 2009

A lesson in Hungarian - Dobos Torte, DB August 2009


Yup, it's that time of the month again.

The August 2009 Daring Bakers' challenge was hosted by Angela of A Spoonful
of Sugar
and Lorraine of Not Quite Nigella. They chose the spectacular Dobos
Torte based on a recipe from Rick Rodgers' cookbook Kaffeehaus: Exquisite
Desserts from the Classic Caffés of Vienna, Budapest, and Prague.


It's been a while since I last make a layered cake, not for myself anyway, so I welcomed this month's challenge with open arms =).

This is the first time I heard about Dobos Torte. After a quick consultation with Google, I found out that Dobos Torte is Hungarian in origin and basically means a layered sponge cake with chocolate buttercream. And, not to forget, the trademark caramel glazed sponge cake layers that forms a fan-like decoration on top of the cake.


Although it is quite time consuming and quite fiddley, this recipe is quite simple. The texture of the sponge cake is one of the best I ever had. I made three mini cakes, I didn't play around with the flavours nor the presentation too much this month. I did had a bit of fun with the caramel-glazed sponge layer.


Thanks ladies for yet another tasty challenge =)

Sponge cake layers

  • 6 large eggs, separated, at room temperature
  • 1 1/3 cups (162g) confectioner's (icing) sugar, divided
  • 1 teaspoon (5ml) vanilla extract
  • 1 cup plus 2 tablespoons (112g) sifted cake flour (SUBSTITUTE 95g plain flour + 17g cornflour (cornstarch) sifted together)
  • pinch of salt

Chocolate Buttercream

  • 4 large eggs, at room temperature
  • 1 cup (200g) caster (ultrafine or superfine white) sugar
  • 4oz (110g) bakers chocolate or your favourite dark chocolate, finely chopped
  • 2 sticks plus 2 tablespoons (250g) unsalted butter, at room temperature.

Caramel topping

  • 1 cup (200g) caster (superfine or ultrafine white) sugar
  • 12 tablespoons (180 ml) water
  • 8 teaspoons (40 ml) lemon juice
  • 1 tablespoon neutral oil (e.g. grapeseed, rice bran, sunflower)

Finishing touches

  • a 7” cardboard round
  • 12 whole hazelnuts, peeled and toasted
  • ½ cup (50g) peeled and finely chopped hazelnuts

Directions for the sponge layers:

NB. The sponge layers can be prepared in advance and stored interleaved with parchment and well-wrapped in the fridge overnight.

1.Position the racks in the top and centre thirds of the oven and heat to 400F (200C).
2.Cut six pieces of parchment paper to fit the baking sheets. Using the bottom of a 9" (23cm) springform tin as a template and a dark pencil or a pen, trace a circle on each of the papers, and turn them over (the circle should be visible from the other side, so that the graphite or ink doesn't touch the cake batter.)
3.Beat the egg yolks, 2/3 cup (81g) of the confectioner's (icing) sugar, and the vanilla in a medium bowl with a mixer on high speed until the mixture is thick, pale yellow and forms a thick ribbon when the beaters are lifted a few inches above the batter, about 3 minutes. (You can do this step with a balloon whisk if you don't have a mixer.)

4.In another bowl, using clean beaters, beat the egg whites until soft peaks form. Gradually beat in the remaining 2/3 cup (81g) of confectioner's (icing)sugar until the whites form stiff, shiny peaks. Using a large rubber spatula, stir about 1/4 of the beaten whites into the egg yolk mixture, then fold in the remainder, leaving a few wisps of white visible. Combine the flour and salt. Sift half the flour over the eggs, and fold in; repeat with the remaining flour.
5.Line one of the baking sheets with a circle-marked paper. Using a small offset spatula, spread about 3/4cup of the batter in an even layer, filling in the traced circle on one baking sheet. Bake on the top rack for 5 minutes, until the cake springs back when pressed gently in the centre and the edges are lightly browned. While this cake bakes, repeat the process on the other baking sheet, placing it on the centre rack. When the first cake is done, move the second cake to the top rack. Invert the first cake onto a flat surface and carefully peel off the paper. Slide the cake layer back onto the paper and let stand until cool. Rinse the baking sheet under cold running water to cool, and dry it before lining with another parchment. Continue with the remaining papers and batter to make a total of six layers. Completely cool the layers. Using an 8" springform pan bottom or plate as a template, trim each cake layer into a neat round. (A small serrated knife is best for this task.)


A baked layer.

Directions for the chocolate buttercream:

NB. This can be prepared in advance and kept chilled until required.

1.Prepare a double-boiler: quarter-fill a large saucepan with water and bring it to a boil.
2.Meanwhile, whisk the eggs with the sugar until pale and thickened, about five minutes. You can use a balloon whisk or electric hand mixer for this.
3.Fit bowl over the boiling water in the saucepan (water should not touch bowl) and lower the heat to a brisk simmer. Cook the egg mixture, whisking constantly, for 2-3 minutes until you see it starting to thicken a bit. Whisk in the finely chopped chocolate and cook, stirring, for a further 2-3 minutes.
4.Scrape the chocolate mixture into a medium bowl and leave to cool to room temperature. It should be quite thick and sticky in consistency.
5.When cool, beat in the soft butter, a small piece (about 2 tablespoons/30g) at a time. An electric hand mixer is great here, but it is possible to beat the butter in with a spatula if it is soft enough. You should end up with a thick, velvety chocolate buttercream. Chill while you make the caramel topping.

Lorraine's note: If you're in Winter just now your butter might not soften enough at room temperature, which leads to lumps forming in the buttercream. Male sure the butter is of a very soft texture I.e. running a knife through it will provide little resistance, before you try to beat it into the chocolate mixture. Also, if you beat the butter in while the chocolate mixture is hot you'll end up with more of a ganache than a buttercream!

Directions for the caramel topping:

1.Choose the best-looking cake layer for the caramel top. To make the caramel topping: Line a jellyroll pan with parchment paper and butter the paper. Place the reserved cake layer on the paper. Score the cake into 12 equal wedges. Lightly oil a thin, sharp knife and an offset metal spatula.
2.Stir the sugar, water and lemon juice in a small saucepan. Bring to a boil over a medium heat, stirring often to dissolve the sugar. Once dissolved into a smooth syrup, turn the heat up to high and boil without stirring, swirling the pan by the handle occasionally and washing down any sugar crystals on the sides of the pan with a wet brush until the syrup has turned into an amber-coloured caramel.
3.The top layer is perhaps the hardest part of the whole cake so make sure you have a oiled, hot offset spatula ready. I also find it helps if the cake layer hasn't just been taken out of the refrigerator. I made mine ahead of time and the cake layer was cold and the toffee set very, very quickly—too quickly for me to spread it. Immediately pour all of the hot caramel over the cake layer. You will have some leftover most probably but more is better than less and you can always make nice toffee pattern using the extra to decorate. Using the offset spatula, quickly spread the caramel evenly to the edge of the cake layer. Let cool until beginning to set, about 30 seconds. Using the tip of the hot oiled knife (keep re-oiling this with a pastry brush between cutting), cut through the scored marks to divide the caramel layer into 12 equal wedges. Cool another minute or so, then use the edge of the knife to completely cut and separate the wedges using one firm slice movement (rather than rocking back and forth which may produce toffee strands). Cool completely.

Angela's note: I recommend cutting, rather than scoring, the cake layer into wedges before covering in caramel (reform them into a round). If you have an 8” silicon round form, then I highly recommend placing the wedges in that for easy removal later and it also ensures that the caramel stays on the cake layer. Once set, use a very sharp knife to separate the wedges.

Assembling the Dobos

1.Divide the buttercream into six equal parts.
2.Place a dab of chocolate buttercream on the middle of a 7 1/2” cardboard round and top with one cake layer. Spread the layer with one part of the chocolate icing. Repeat with 4 more cake layers. Spread the remaining icing on the sides of the cake.
3.Optional: press the finely chopped hazelnuts onto the sides of the cake.
4.Propping a hazelnut under each wedge so that it sits at an angle, arrange the wedges on top of the cake in a spoke pattern. If you have any leftover buttercream, you can pipe rosettes under each hazelnut or a large rosette in the centre of the cake. Refrigerate the cake under a cake dome until the icing is set, about 2 hours. Let slices come to room temperature for the best possible flavour.

Wednesday, August 26, 2009

A musical birthday


Whoa! I'm swamped with cake orders this month. Well, not really, but when you have a full time job and a dad visiting, 3 big cake orders is quite a handful for a 2 weeks span. The first one is a cupcake tower for my friend's wedding which I will blog later this week. And the second one, is a birthday cake for a special little girl who turns 14. Almost a woman =).


She loves music, so she wants a musical themed cake. At first she wanted a guitar shaped cake. But I'm pressed for time and I'm not that daring enough nor skillful enough to decorate a 3D cake just yet. So I suggested something similar. I based this design on Planet Cake's exploding star cake that I made in the Basic 101 class, but replacing the stars with a guitar and making it into a two tier cake. For an extra touch, I painted some musical notes on the cake using black food colouring.


Phew! two orders down, one more to go!

For detailed recipe on the cake and the ganache I use, please refer back to this post.

Wednesday, August 12, 2009

A taste of home - Nasi tim ayam jamur (Chicken rice with mushroom)


My dad is visitting for two weeks. This means a lot of eating out =). However, for his lunches, I like to cook for him so he doesn't have to end up settling with greasy chinese food most of the time since it's the easiest and closest thing from my house.

This dish was actually a request from a good friend who fell ill and crave for comforting homemade food. His girlfriend cooks to kill so these times, I gladly fill in the role of nourishing him. I've never tried making this dish before, and it is one of my childhood favourites, so when he requested, I happily obeyed it.

I didn't think that this dish was this simple to make. I usually avoids anything that requires steaming, but to my surprise, the rice is actually steamed separately from the chicken, so I can actually make the rice as per the normal way of making rice, in the rice cooker. Only this time, the rice is cooked in chicken stock, not water to achieve the fragrant and tasty chicken rice. Using homemade chicken stock takes this dish into a different level.


Nasi tim ayam jamur (Chicken rice with mushroom)

Chicken rice
2 cups of rice
250ml chicken stock (preferably homemade)
water
2 tbsp soy sauce
1 tsp sugar
a dash of sesame oil
1 cm ginger, crushed
2 clove of garlic, finely sliced

Wash rice and rinse thoroughly. In a rice cooker, mix chicken stock, water, soy sauce, sugar, sesame oil, ginger and garlic. Add cleaned rise and cook until it's done.


For the chicken

2 boneless chicken thigh fillet, remove excess fat, diced
50-80g of button mushroom or swiss brown
4 cloves of garlic, finely chopped
2 cm ginger, crushed
sauce (for the sauce, I didn't actually measure it, mix according to your taste, the taste you should get is a strong garlicky & gingery flavour with a sweet undertone from the soy sauce):
soy sauce, oyster sauce, ketjap manis, salt, pepper, sugar, sesame oil, chinese five spice powder, corn starch, vegetable oil

Marinate chicken pieces with a bit of dark soy, sesame oil, sugar and 1 tbsp corn starch for 1-2 hours. Saute garlic and ginger in hot oil, add chicken pieces until cooked through, add the sauce.

Soup
250 ml chicken stock
1 cm ginger, crushed
1 clove of garlic, crushed
salt & pepper to taste
1 tbsp of soy sauce
dash of sesame oil

In a heavy based saucepan, saute garlic and ginger with a bit of oil. Pour in the stock and cook until boiling. Season with soy sauce, salt & pepper to taste.

Tuesday, August 11, 2009

Quince & Apple Crisps with Rum Raisin


I have a friend that is obsessed with apple crumble. She can skip meals when she knows I'm making apple crumble just so she have enough room in her stomach for my crumble. She can easily polish off one whole pan of apple crumble by herself in one seating. That actually what she did last year when I made her a big pan of apple crumble for her birthday.


Sadly, this year, her birthday falls the day before my exam, so eventhough it's already a month late, she still demands her birthday apple crumble. I usually use my ex housemate's recipe where she used canned apple and muesli and desiccated coconut in the crust. But eversince I encounter this recipe in the Bon Appetit special thanksgiving issue more than 2 years ago, I never look back. It is definitely requires a lot more work and time consuming. But if you plan your meals cleverly, this dish can actually be done in steps over a couple of days. No shortcuts here either. I love the combination of quince and apple. It gives an interesting texture to the dish. The rum raisin gives an extra punch too.


The recipe actually produce quite a lot of stuffing. I love a thick layer of crust, so when making this, I always double the crust topping quantity, and bake it in individual ramekins for late night snacks for me =). I usually serve this with store bought pouring custard, but after I gave the whole bottle to my friend, I left with none for me. So I made my own vanilla custard from scratch. A good way to use up the dying bottle of milk I have in the fridge.


Apple and Quince Crisp with Rum Raisins

Bon Appétit | November 2007


Rum Raisins:
  • 1 1/2 cups raisins
  • 1 cup dark rum

Crisp Topping:
  • 3/4 cup (1 1/2 sticks) unsalted butter
  • 2 cups all purpose flour
  • 1 cup sugar
  • 1 teaspoon ground nutmeg
  • 1/4 teaspoon salt

Filling:
  • 4 cups water
  • 3 1/2 cups sugar, divided
  • 2 pounds quinces (about 5 medium), peeled, quartered, cored
  • 4 large Gala apples, peeled, cut into 1-inch pieces
  • 2 tablespoons fresh lemon juice
  • 1 tablespoon all purpose flour
  • 1/4 teaspoon salt
  • Whipped cream or vanilla ice cream

For rum raisins:
Simmer raisins and rum in small saucepan 3 minutes. Remove from heat. Ignite with match; let flames burn out, about 4 to 5 minutes. Transfer 2 tablespoons liquid to small bowl for crisp topping.

For crisp topping:
Melt butter in small saucepan over medium-low heat. Simmer until butter is golden brown, about 6 minutes. Cool.

Mix flour, sugar, nutmeg, and salt in medium bowl. Add browned butter and 2 tablespoons reserved liquid from rum raisins; stir until moist clumps form. DO AHEAD: Raisins and topping can be made 1 day ahead. Cover each; chill.

For filling:
Combine 4 cups water and 3 cups sugar in large saucepan. Stir over medium heat until sugar dissolves. Add quinces; simmer until tender, 15 minutes. Remove from syrup; cool. Reserve syrup for another use. Cut quinces into 1-inch cubes. Transfer to large bowl. DO AHEAD: Can be made 1 day ahead. Cover and chill.

Position rack in center of oven and preheat to 350°F. Butter 13x9x2-inch glass baking dish. Add apples, lemon juice, flour, salt, remaining 1/2 cup sugar, and rum raisin mixture to bowl with quinces; toss to blend. Transfer to baking dish. Crumble topping over.

Bake apple and quince crisp until golden and bubbling, about 55 minutes. Cool at least 30 minutes. Serve warm or at room temperature with softly whipped cream or ice cream.

Monday, August 10, 2009

Fish for dinner - whole baked salmon en papillote with Lemon & fennel


I've been a bad bad blogger. Lately my entries usually comprise of daring baker challenges and that's about it. I used to be able to blame uni studies, but now that it's over, I'm running out of excuses. I guess the old excuse of "life just gets in the way" is the best one I can think of. My kitchen is busy as always though. Busier than ever actually. I have been baking and cooking like crazy to contemplate all those times consumed with study and assignments. I just didn't find the time, energy, nor the inspiration to blog.

Lately, my thoughts are consumed with this huge decision I'm about to make. Perhaps one of the biggest decision in my life. I think I mentioned somewhere before that I planned to move back to Indonesia this year. But I put that aside to focus on my study, now, it's getting closer and closer to becoming a reality. No dates has been set yet. And there's still a lot of details that I need to figure out. Breaking the news to my boss has been the first step. It's so overwhelming!!! Just the thought of packing 7 years of my life and saying goodbye to this beautiful city where I basically spent most of my adult life is extremely hard and very daunting. What most daunting for me is saying goodbye to M. We decided to try a long distance relationship for the time being and see how we go from there. Having coming out of a 4 years relationship where the 3 years out of it are spent apart, I'm certainly not looking forward to relive the experience. It's just something we have to do. If it's meant to be, there will be a way.


From now on, I'll be busy cramming as much as "melbourne experience" as I can. So I can bottle up enough memories of this city to last me till the next visit. But hey, coming home to the love of your family and childhood friends sort of make all this 'separation' worth doing. And I won't know what the future holds for me. I can easily end up back in Melbourne in a couple years time. For now, I need to go back home and start taking care of my parents.

This is why I've been cooking lots of comfort food. My mind just needs to be soothed from all this as well as the freezing weather Melbourne has delivered this couple of weeks.


I'm trying a new technique to cook this beautiful whole trout I got from the market. The term 'en papillote means 'in parchment' in french. It's a technique of cooking fish or meat in their own juice inside a parcel made out of aluminium foil or baking paper. The parcel traps the heat and steam and gently cooks the meat and infuse it with flavour. I love this technique as it gives a very strong infusion to the meat while keeping it moist and juicy. I never cook with fennel before, but it goes beautifully with the trout. I serve this fish with a rich and creamy baked potatoes. The tanginess and freshness of the fish marries perfectly with the richness and creaminess of the potatoes. Definitely a perfect comfort food for a chilly night with a tall glass of white wine.

Baked whole trout en papillote with lemon and fennel
Original recipe can be found at the Times Online October 3, 2007


1 whole trout, cleaned and gutted
1 tbsp classic vinaigrette
1-2 tbsp olive oil
1 bulbs of fennel, tough core removed and finely diced
2 cloves garlic, peeled and finely sliced
4 slices of lemon
Salt and freshly ground black pepper
60-70ml dry white wine

1 Preheat the oven to 200C/Gas 6, or light the barbecue.
2 Place the trout on a clean chopping board and make 3-4 deep slices in each side of the fish, then season well with salt and pepper.
3 Take four large pieces of tin foil and brush the surface with olive oil
4 Fill the cavity of each trout with the fennel and garlic and place the fish inside the foil. Place the slices of lemon confit on top of the fish, carefully pull the foil up to create a parcel, then pour over the wine.
5 Scrunch the top of the foil together to form a nice, tight parcel.
6 Place in the preheated oven or barbecue and cook for 10-15 minutes.
7 Transfer the fish in the foil to the serving plates, then open up the foil parcels - eat straight from the foil if you like.

Sunday, August 9, 2009

Lemon sable cookies with Yuzu lemon curd


I have some Yuzu lemon curd leftover from the bakewell tart that is last month's daring bakers challenge (I actually made this cookies about 1 month or so ago, and no, I don't use a month old curd), after making lemon meringue tart, I ran out of ideas of the things to use this curd with. So I bake some of Dorie Greenspan's Sable au Citron which I've been wanting to try ever since I read it in her Paris Sweets book.

A couple of friends come over to my place so we have these cookies with a cup of 'teh gopek', Indonesian black tea in my new moroccan tea set. They're just lovely.

Tuesday, August 4, 2009

Marshmallowy goodness - DB July 09


I'm late, yet again.
My timing is just wayyyy off lately.

The July Daring Bakers' challenge was hosted by Nicole at Sweet Tooth. She chose Chocolate Covered Marshmallow Cookies and Milan Cookies from pastry chef Gale Gand of the Food Network.

Hope this post will still make the cut of July's DB challenge.
I only made the mallows, since I'm not that fond of milano cookies nor do I have the time and energy to do two kinds.


I made marshmallows before, and they are super easy and way better than the store bought one. So when I see this month (last month's I mean) challenge, I was quite excited. My boss was too, because I've been raving about homemade marshmallow to her but never had the chance to actually made one for her.


This time, I made strawberry marshmallow to go with the cinnamon cookies. The cookies was amazing by the way, and a breeze to whip up. I sprinkle the marshmallow with strawberry powder to intensify the strawberry flavour even further. After dipping the mallows in chocolate, I sprinkle pink glitter and put edible gold leaves on top. They look just adorable.


I made PLENTY of marshmallow. After giving some to my boss, I took the rest to the snow with me. Just picture a steaming hot choco with these babies while it's pouring snow outside.. Pure bliss. It even made me forgot how lousy the weather was all weekend at Mt. Buller.


Mallows(Chocolate Covered Marshmallow Cookies)
Recipe courtesy Gale Gand, from Food Network website

Prep Time: 10 min
Inactive Prep Time: 5 min
Cook Time: 10 min
Serves: about 2 dozen cookies

• 3 cups (375grams/13.23oz) all purpose flour
• 1/2 cup (112.5grams/3.97oz) white sugar
• 1/2 teaspoon salt
• 3/4 teaspoon baking powder
• 3/8 teaspoon baking soda
• 1/2 teaspoon ground cinnamon
• 12 tablespoons (170grams/ 6 oz) unsalted butter
• 3 eggs, whisked together
• Homemade marshmallows, recipe here
• Chocolate glaze, recipe follows

1. In a mixer with the paddle attachment, blend the dry ingredients.
2. On low speed, add the butter and mix until sandy.
3. Add the eggs and mix until combine.
4. Form the dough into a disk, wrap with clingfilm or parchment and refrigerate at least 1 hour and up to 3 days.
5. When ready to bake, grease a cookie sheet or line it with parchment paper or a silicon mat.
6. Preheat the oven to 375 degrees F.
7. Roll out the dough to 1/8-inch thickness, on a lightly floured surface. Use a 1 to 1 1/2 inches cookie cutter to cut out small rounds of dough.
8. Transfer to the prepared pan and bake for 10 minutes or until light golden brown. Let cool to room temperature.
9. Pipe a “kiss” of marshmallow onto each cookie. Let set at room temperature for 2 hours.
10. Line a cookie sheet with parchment or silicon mat.
11. One at a time, gently drop the marshmallow-topped cookies into the hot chocolate glaze.
12. Lift out with a fork and let excess chocolate drip back into the bowl.
13. Place on the prepared pan and let set at room temperature until the coating is firm, about 1 to 2 hours.

Note: if you don’t want to make your own marshmallows, you can cut a large marshmallow in half and place on the cookie base. Heat in a preheated 350-degree oven to slump the marshmallow slightly, it will expand and brown a little. Let cool, then proceed with the chocolate dipping.

For the homemade marshmallow, I used Nightscotman's strawberry marshmallow which are a variation of Martha Stewart's vanilla marshmallow found here

Chocolate glaze:

• 12 ounces semisweet chocolate
• 2 ounces cocoa butter or vegetable oil

1. Melt the 2 ingredients together in the top of a double boiler or a bowl set over barely simmering water.

Sunday, July 5, 2009

A weekend getaway

M had a couple of reason to celebrate this month. We usually celebrate our big events with a nice night out dining in some fancy place. However, this month he has two big things that is wothy of a big celebration, one is his birthday, and the other one is a new job. In this economy, I'm considering myself lucky enough to still have a job, but for M to be able to find a new full time job with a hefty pay rise is a definite bonus. We were planning to try some fancy restaurant like Half Moon in Brighton or Andrew McConnell's newest restaurant, Cutler & Co. Since I was completely drained out from cramming for exams and working in unGodly hours (you see, my work has been CRAZY this past weeks, just in time with my exams no wonder I'm sick right?), fine dining will not sufficient enough to rejuvenate my spirit. So I propose a better outlet, a weekend away.

Staying in wineries always a good way to invigorate, but due to winter, I don't think the wineries will be that attractive. It will be just dried up branches. And a couple of good places I found online was devastated by the recent bushfire. My boss sugested a place in Lorne where she recently stayed in. They're doing a great deal at the moment where you pay $195 for Saturday night, and add $5 to stay on the Friday night. Sweet! Lorne is such a beautiful place, there's the beautiful beaches, waterfalls, farms, and a couple of little wineries. Our place sets out in the middle of the bush. The cottage is sooooo beautiful. The area offers seclution and tranquility. It was quite scary when we first got there. It was pitch black, we can barely see the road leading up to the cottage. But the crackling open fire that Sarah, the cottage keeper kindly got going for us was just.... bliss. Morning time, we can see that our cottage is actually surounded by a lot of houses, so there's no need to worry.


I packed up quite a lot of food for the both of us. We want to spend as much time with each other with no distractions and interuption from other people so eating in by the fire seems like the best way to go. It made me realize how changed I am this past year as a cook/baker. A year ago, when going on a road trip, the main thing on my mind is what clothes to bring and what DVD or game should I pack to entertain myself. Now, I planned menus, wines to bring, weeks before the trip. I even created a detailed rundown of food to prepare, when to cook it and what can be done beforehand. And I'm not just talking about one or two meals here, it's all the meals including breakfast, lunch, dinner, after dinner, even some practical food to eat on the road.

In preparation, I made a tomato ragu for the baked eggs, pancake mix (dry and wet ingredients separated), marinate my lamb, salad dressing, and facon & egg sandwiches with perinaise for our dinner on the road. We didn't want to waste time having dinner before we go, so we can get to Lorne before 10pm.

Baked eggs with parmigiano soldiers


We actually went on this trip about two weeks ago, but only now after I am fully recovered from my flu that I actually had time to blog about it. I actually started to get sick on the Friday night when we went to Lorne. Started out with light fever and a bad sore throat. But I popped enough vitamins and echinacea to not let it ruin my weekend. I guess my body just finally gave up after I torture it with sleep deprivation and lack of nutrition for more than a month. By monday last week, I completely lost my voice. My doctor said I sounded like a frog, but I refer it as my sexy voice =p. Can't say the same about the runny noise and the all night coughing though. Well I gues it's just nature's way of telling me to rest, and that I did, I didn't work for three days and was fully rested.

lamb chops with rosemary and red wine jus

Pear & rocket salad
So here's the menu that we had:
Friday - facon, egg, cheese, lettuce & tomato sandwiches with nando's perinaise
Saturday - Tomato & feta baked eggs with parmigiano soldiers, Minnestrone soup (ready
made) for lunch, Rosemary lamb chops with red wine jus with baked potatoes
and pear & rocket salad, Cheese platter for after dinner
Sunday - Was going to make pancake, but left the pancake mix, so we had breakfast in the
local cafe and went for some tapas lunch at BaBaLu bar


cheese platter

Baked eggs with parmigiano soldiers

Parmigiano soldiers:
1 loaf of crusty white bread or sourdough
good quality parmigiano regiano, grated
2 eggs
dash of milk
oil for frying

Cut bread into 1 cm x 1 cm thick soldiers. In a shalow bowl/dish, beat eggs and milk. Soak the bread in the eggy mixture and coat it with the cheese. Deep fry until golden brown. Preheat the oven to 180C. Soak up all the oil with a paper towel, and put soldiers in a baking pan. Bake for 10-15 minutes until crispy.

Tomato base:
3 vine ripened tomatoes
beef sausage
1 onion, sliced
2 garlic cloves, crushed
1 rosemary stalk
Olive oil

With a sharp knife make an X marking on the tomatoes. Boil water and pour it into a large bowl. Soak tomatoes in boiling water until the skins come off. Once the skins comes off, peel tomatoes and put in a baking tray. Season with freshly cracked pepper and salt, and drizzle with olive oil. Roast garlic, rosemary and tomatoes for 30-40 minutes or until the tomatoes are soft. Once it's soft, mash with a fork or if you like your tomate base to be smooth, blend all the roasted ingredients in a blender/food processor until smooth. In a large pan, saute onion with a dash of olive oil until fragrant and slightly transparent. Add the tomato puree and cook until it boils. Take the beef sausage and with a sharp scissor, snip the skin off one of the ends. With your fingers, squeeze out about a teaspoon of the sausage filling and round it into a ball and cook it in the tomato sauce. Voila, a quick meatballs in tomato sauce. Sometimes I like to add 1/2-1 diced fresh tomatoes for added texture to the sauce. Cook until the sauce thickens slightly. This sauce is also great as a pasta sauce.

For the baked eggs, put tomato sauce on an ovenproof ramekins. Preheat oven to 170C. Crumbled some Greek feta. Carefully crack two eggs and bake until the desired doneness. I like my eggs hard, so I cook it for around 15-20 minutes, M likes his runny, so 10 minutes should be perfect.


Lamb chops with pear & rocket salad

Pear & rocket salad
1 green pear
Greek feta
Toasted almonds or walnuts
Rocket
Balsamic vinegar
Olive oil

For the dressing, whisk olive oil and balsamic vinegar and season with salt & pepper to taste. Slice the pear thinly. Mix rocket, feta, pear & almonds in a salad bowl. Lightly dress it with the vinegar dressing.

Lamb chop
6 french cut lamb chops
4 sprigs of fresh rosemary
bunch of mint leaves
2 garlic cloves, crushed
olive oil
300 g of chat potatoes, roasted with rosemary

red wine

Marinate lamb chops with the olive oil, garlic, rosemary and 4-5 mint leaves for at least 30 mins. Season with salt & pepper. Preheat oven to 180C. Chop finely the remaining mint leaves. Infuse about 30ml of olive oil with the chopped mint leaves. You can do this way ahead of time to get a stronger mint flavoured oil. Brown the lamb chops for about 1 minute on each side. Transfer to the baking tray immediately and roast for 10-15 minutes until cook through, but still pink in the middle. De glaze the pan with the red wine and cook until it reduces slightly. In a plate, arange the potatoes in a circle, topped with the lamb chops. Drizzle the red wine jus and the mint oil.

Monday, June 29, 2009

Bakewell tart....er pudding - DB June 2009


Phew.. I finally made it. I didn't thought I will be able to participate in this month's challenge. I've been down with a heavy case of flu this past week. No, it's not swine flu, but it felt worst than that. Stuffy nose, high fever, nose bleeds, croaky voice, and what's worst, the dry cough that kept me up most of the night. I blame it on the weather! and my exhaustion from all that studying and working at the same time.

I have to be honest with you, when I found out the challenge was a tart, I wasn't too excited. Not my favourite kind of pastry. But as I read on, I found out that it was a frangipane tart. This I love! I've been wanting to try my hands on making a frangipane tart for ages. As I mentioned before, post-exam and down with the flu is not exactly the best time to get my creative juice running. So I settled for a simple & basic flavour combination. I made 2 version, one is green tea frangipane with homemade raspberry jam and the other one is vanilla frangipane with yuzu lemon curd.

The June Daring Bakers' challenge was hosted by Jasmine of Confessions of a Cardamom Addict and Annemarie of Ambrosia and Nectar. They chose a Traditional (UK) Bakewell Tart... er... pudding that was inspired by a rich baking history dating back to the 1800's in England.


The bakewell tart itself, being a traditional English dessert, has a rich history behind it. Instead of boring you with it, you can read it here, or visit Jasmine's blog. She talked a lot about the history and lore about the bakewell tart....er pudding.


I personally LOVED this tart or pudding. The almond frangipane is light and fluffy yet so decadent. The homemade shortcrust pastry is beautiful. The texture is perfect for me. Making this cake is quite simple and quick. This recipe is definitely a keeper. The combination of green tea and raspberry is perfect. Not too sweet, and the green & red colour combine with the brown from the crust is so beautiful. Whereas the Yuzu one.. yumm is all I can say. I'm falling in love with Yuzu. I love it's aromatic flavour with a less tanginess when compared to original lemon. It almost taste like a lemonade, even though I didn't add sugar or soda to it. Thank you so much for the hostess for showing me this wonderful recipe. Please check the other daring bakers for their wonderful creations. Hopefully all of you can enjoy this recipe as much as I did =)


Bakewell Tart…er…pudding

Makes one 23cm (9” tart)
Prep time: less than 10 minutes (plus time for the individual elements)
Resting time: 15 minutes
Baking time: 30 minutes
Equipment needed: 23cm (9”) tart pan or pie tin (preferably with ridged edges), rolling pin

One quantity sweet shortcrust pastry (recipe follows)
Bench flour
250ml (1cup (8 US fl. oz)) jam or curd, warmed for spreadability
One quantity frangipane (recipe follows)
One handful blanched, flaked almonds

Assembling the tart
Place the chilled dough disc on a lightly floured surface. If it's overly cold, you will need to let it become acclimatised for about 15 minutes before you roll it out. Flour the rolling pin and roll the pastry to 5mm (1/4”) thickness, by rolling in one direction only (start from the centre and roll away from you), and turning the disc a quarter turn after each roll. When the pastry is to the desired size and thickness, transfer it to the tart pan, press in and trim the excess dough. Patch any holes, fissures or tears with trimmed bits. Chill in the freezer for 15 minutes.

Preheat oven to 200C/400F.

Remove shell from freezer, spread as even a layer as you can of jam onto the pastry base. Top with frangipane, spreading to cover the entire surface of the tart. Smooth the top and pop into the oven for 30 minutes. Five minutes before the tart is done, the top will be poofy and brownish. Remove from oven and strew flaked almonds on top and return to the heat for the last five minutes of baking.

The finished tart will have a golden crust and the frangipane will be tanned, poofy and a bit spongy-looking. Remove from the oven and cool on the counter. Serve warm, with crème fraîche, whipped cream or custard sauce if you wish.

When you slice into the tart, the almond paste will be firm, but slightly squidgy and the crust should be crisp but not tough.

Sweet shortcrust pastry

Prep time: 15-20 minutes
Resting time: 30 minutes (minimum)
Equipment needed: bowls, box grater, cling film

225g (8oz) all purpose flour
30g (1oz) sugar
2.5ml (½ tsp) salt
110g (4oz) unsalted butter, cold (frozen is better)
2 (2) egg yolks
2.5ml (½ tsp) almond extract (optional)
15-30ml (1-2 Tbsp) cold water

Sift together flour, sugar and salt. Grate butter into the flour mixture, using the large hole-side of a box grater. Using your finger tips only, and working very quickly, rub the fat into the flour until the mixture resembles bread crumbs. Set aside.

Lightly beat the egg yolks with the almond extract (if using) and quickly mix into the flour mixture. Keep mixing while dribbling in the water, only adding enough to form a cohesive and slightly sticky dough.

Form the dough into a disc, wrap in cling and refrigerate for at least 30 minutes

Vanilla / Green tea Frangipane

Prep time: 10-15 minutes
Equipment needed: bowls, hand mixer, rubber spatula

125g (4.5oz) unsalted butter, softened
125g (4.5oz) icing sugar
3 (3) eggs
2.5ml (½ tsp) almond extract
125g (4.5oz) ground almonds
30g (1oz) all purpose flour

Added flavourings:
1 Vanilla pod
2tbs of matcha powder

Cream butter and sugar together for about a minute or until the mixture is primrose in colour and very fluffy. Scrape down the side of the bowl and add the eggs, one at a time, beating well after each addition. The batter may appear to curdle. In the words of Douglas Adams: Don’t panic. Really. It’ll be fine. After all three are in, pour in the almond extract and mix for about another 30 seconds and scrape down the sides again. With the beaters on, spoon in the ground nuts and the flour. Mix well. The mixture will be soft, keep its slightly curdled look (mostly from the almonds) and retain its pallid yellow colour.

Scrape the seeds of one vanilla bean and to the frangipane mixture. Set aside the required amount for the vanilla/yuzu lemon tart and add green tea/ matcha powder to the other half of the frangipane mixture. Mix well

Raspberry jam

1 punnet of raspberry (250g), blend and sieved through a fine sieve to remove the seeds
250g sugar
1-2 tsp of pectin

In a heavy based saucepan, cook raspberry juice, sugar and pectin to a boil. Once it boiled, turn down the heat and simmer until it thickens. Turn off heat and cool to room temperature before using. Any excess jam can be stored in a sterilized jar and spread on your toast in the morning.

Yuzu lemon curd

1/2 cup of Yuzu lemon juice zest of 1 lemon 1/2 cup sugar 3 large eggs 125g butter, at room temperature In a heavy saucepan, whisk together alll the ingredients and cook in a medium-low heat. Whisk constantly until the curd thickens and can easily coat the back of a spoon. Transfer to a bowl and wrap tightly with a cling wrap. Cool to room temperature before transfering to the fridge. Chill for a minimum of 2 hours before using.

Thursday, June 25, 2009

A cocktail to celebrate

I'm freeeeeeeeeeeeeeeee!!!!!!!
No more exam, no more assignment, no more group meetings.
But you know what, when I was a full time student, a nice holliday or time off usually follows, but now, I'm just back to become a full time worker. hmpfh!

I made this cocktail for my boss' BYO cocktail party. It's lychee, lime and mint vodka tonic with strawberry pearls. I think I mentioned before that I tried my hands on molecular gastronomy, but it wasn't so good because the pudding didn't set. However this time, I got pictures! =).


For detailed instruction & recipe on making the pearls, please visit Michael Laiskonis' blog

Lychee, mint and lime Vodka tonic
Adapted from Good Taste Magazine July 2009
serves 12-15

2 cans of lychee, diced
110g brown sugar
40 fresh mint leaves
4-5 limes, quartered
360ml vodka
2L Soda water, chilled, to serve
Ice cubes, to serve

Divide the sugar, mint lime, and lychee among serving glasses. Use the end of a rolling pin to gently pound until lime is crushed.Pour vodka among glasses. Top with soda water and ice. Serve.

Monday, June 15, 2009

Dumpling dinner party - DC June 2009

**updated, ooppss.. sorry, I forgot to thank Jen from userealbutter for being a terrific hostest on this month's challenge. Please forgive me, I was busy cramming for exam when I made this post =p**


A day late, but I promise you, it will be worth the wait.


I went all out for this month's Daring Cooks. The brief said to make potstickers, but since I love dumplings soooo much, I made it 4 ways.. with 3 different fillings. Plus a dessert version to end the night with a sweet note.


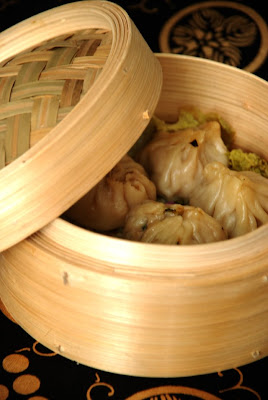
xiao long bao

In the midst of my cramming session for my exams, I allocate one whole day to make this dumplings. The pleating and rolling out the dumpling proved to be quite therapeutic and a short escape from the grueling hours buried in books. I have a couple of dumpling recipe that I want to try so instead of picking one, I decided to try them all. But being the idiot that I am, instead of doing the fillings half the recipe or even less, I did all of them in full quantity, so I end up with heaps of dumplings. Fortunately, they freeze well, so I can enjoy them for weeks.
I invited a couple of friends for a dumpling dinner.


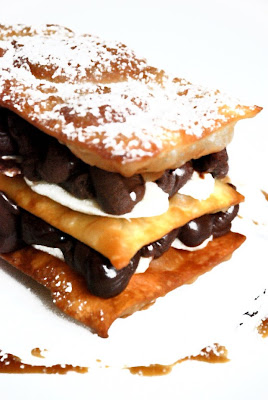
I made the whole dinner with dumplings. Mushroom and tofu potstickers in thick broth for appetizer, prawn & chicken and wafu gyoza dumplings served in 2 ways for the main, and a choc caramel banana mille feuille for dessert. For the main course, I boil the dumplings and made it as a dumpling noodle soup.

xiao long bao

To accompany the noodle soup, I also made some xia long bao. Xia long bao is a traditional shanghai style dumplings where each delicate dumplings holds a tasty soup in the middle. I used to think they inject the soup into the dumpling. But after reading chef Joycelyn's rendition of it, I found out that the broth was first set into a gelee that looks like a translucent jewel-like cubes. Then, from the steaming process, the gelee liquifies back into a broth, hence the soupy centre in the dumplings. I've tried making xiao long bao before, and back then, I was making it for myself, so I can actually use the secret ingredient that makes the broth very gelatinous, even without the addition of a setting agent like agar-agar or gelatine.It is very simple really, the secret lies in the skin of a pig, or pork rind. It is so fatty and rich in albumen and colagen that is very gelatinous when cooked in water. However, this time, as I am cooking for M this time, I used chicken stock and add agar-agar to make it set. I still couldn't get the pleating technique right, but it's good enough for me.
The appetizer is actually inspired from watching masterchef. I'm so addicted to masterchef lately, I sometimes even watch the rerun on my lunch hour. It was the winning dish that made Julia won the invention test which then leads to her win over chef Peter Evans and a guaranteed spot in the finals.


And last but not least, being the sweet tooth that I am, I couldn't resist making a dessert. I deep fried the lefover dumpling skin, and made an asian mille feuille with banana, chocolate and caramel sauce. The chocolate mousse is also leftover from my friend's two tier birthday cake.


As you can see, I enjoyed this challenge so much. Thank you Jenn for the tasty challenge, as well as the recipe. Can't wait for next month's challenge =)


Dumpling skin:
250g flour
1tsp salt (replace with sugar for the mille feuille)
100ml boiling water

Combine salt and flour in a bowl and make a well in the centre. Boil water, and as soon as it stop's bubbling, pour into the well in the centre of the flour mixture. With a fork, slowly incorporate flour into the water until it forms a dough. Transfer to a work surface and continue working on the dough until it forms a smooth ball. Keep covered in a damp cloth all the time when you're not working with the dough to prevent it from drying out.


Mushroom & Tofu filling:
Recipe by Julia, Masterchef Australia finalist

50g firm tofu, finely diced
2 stems choy sum, finely chopped
50g mixed Asian mushrooms, finely diced
1 tsp fresh ginger finely diced

combine the tofu, greens, mushrooms and ginger in a bowl, mix and season.

Broth:
3 cups chicken stock
1 tbs caster sugar
¼ cup black vinegar
1 tbs light soy sauce
2cm piece ginger, peeled and sliced

For the broth, pour the stock into a saucepan. Add the sugar, vinegar, soy and ginger. Place over a medium heat and allow to simmer.

Shrimp & chicken filling:

1/2 lb (225g) raw shrimp, peeled, deveined, and coarsely chopped
1/2 lb (225g) ground chicken
5 chinese chives, minced
1/4 cup (55g) ginger root, minced
1 tsp (5g) salt
3 tbsp (40g) sesame oil
2 tbsp (16g) corn starch

Combine all filling ingredients in a large mixing bowl and mix thoroughly (I mix by clean hand). Cover and refrigerate until ready to use (up to a day, but preferably within an hour or two).

Wafu gyoza filling recipe can be found here

Xiao Long Bao:

broth gelee:
500ml of chicken stock - preferably home made
half a packet of agar-agar

in a separate bowl, disperse agar-agar in 50ml of stock, set aside. In a saucepan, bring stock to the boil, season with salt and pepper. Add the agar-agar and simmer for 1-2 mins. In a shallow dish, pour the stock and cool to room temperature. Set in refrigerator for a couple of hours or overnight. After fully set, dice gelee into cubes.

For Xiao Long Bao, I use the wafu gyoza filling and the shrimp & chicken filling. Steam in a bamboo steamer over a bed of lettuce.

Noodle soup:
bunch of shitake mushroom
bunch of enoki mushroom
egg noodle
1L of chicken stock
200-400ml of water
hoisin sauce
soy sauce
ginger
dash of fish sauce
sesame oil
bunch of chinese chives
bok choy

Boil chicken stock and water in a large pot. Add sauces & ginger according to taste. put dumplings and boil for a couple of minutes until it becomes see-through. Put in mushrooms, bok choy and chives and simmer until it boils again. Cook noodle according to pack instruction. Put noodles in individual bowls, pour the soup over.

Potstickers:
In a shallow pan, heat oil and fry the dumplings until browned in the bottom. Pour in chicken stock and cover pan immediately, trapping the steam inside. Please be careful, as it will splatter a lot. If you're like me, the thought of oil splattering is unbearable, steam it in a separate pan. While the dumpling is cooking, in a separate pan, heat up chicken stock. As the dumplings browned, transfer the dumplings to the pan with chicken stock and cover immediately. Steam until most of the stock are absorbed by the dumpling and dumplings are translucent.